• Japanese
  • English
  • What is Shelf?
    • What is Shelf?
    • System Requirements
    • Security
  • Basic Menu Screen
    • Basic Menu Screen
  • Basic Functions
    • Basic Functions
  • Terminology
    • Terminology
  • Signing In
    • How to log in
    • Changing the Language (Multi-Language Function)
    • Reissuing Passwords
  • User Menu
    • User Menu Items
    • History
    • Change Password
    • Guideline
    • Address Book
    • Enterprise List Settings
  • Searching and Viewing
    • Viewing
    • Searching menus
    • Searching tags
    • Using the Refined Period Search Function
    • Using the Advenced Search Function -Detailed Period Version-
    • Share Page Link
    • Search All
  • Using Content
    • Selecting Content
    • Share Page Link
    • Downloading
    • Downloading Masters
    • Downloading from the Notification Email
    • Download Requests
    • Sending
    • Creating PDFs (Contact Sheets)
    • Download for cloud storage linkage
  • Moving/Copying Content
    • Moving Content
    • Copying Content
  • Editing Meta Information
    • Editing Meta Information
    • Editing Meta Information on multilingual sites
    • Changing Master Content
    • Changing Preview Data
    • Changing Thumbnail
  • Registering Content
    • Registering Content
    • Registering Content by Non-Shelf Users
    • Registering Sub-content
    • Registering/Editing the Sub-content Area
    • Registering Versions
    • Automatic Thumbnail Generation Formats
    • Automatic the JPEGs Generation Formats.
    • Content Statuses
  • Deleting Content
    • Deleting Content
    • Deleting Versions
    • Deleting Sub-content
    • Deleting Sub-content Areas
  • Menus and Folders
    • Library Menus and Folders
    • Creating Menus/Folders
    • Editing Menus/Folders
    • Deleting Menus/Folders
    • Sorting Menus/Folders
  • Relations / Groupings
    • Relations and Groupings
    • Setting Relations / Groupings
    • Removing Relations / Groupings
    • Bulk Registration of Relations/Grouping
  • Tags
    • What are Tags?
    • Creating/Editing/Deleting Tags
    • Creating/Editing/Deleting Tag Groups
    • Sorting Tag Groups
    • Assigning/Removing Tags
    • Bulk Registration of Tags/Tag Groups
  • List of maximum input values
    • List of maximum input values
  • Importing/Exporting Lists
    • Importing/Exporting Lists
  • Favorites Menu
    • What is the Favorites Menu?
    • Creating/Editing/Deleting Favorites
    • Sorting Favorites
    • Adding/Deleting Content in Favorites
    • What is Sharing Favorites?
    • Adding Members to a Shared Folder
    • Viewing/Removing Shared Members
    • Adding/Deleting Content in Shared Folders
    • Removing Shared Status
    • Deleting Shared Folders
  • Administrator Menu
    • Administrator Menu List
  • Manage Users
    • Registering, Editing, and Deleting Users, and Bulk Registration
    • User Registration Requests
  • Manage Notifications
    • Registering, Editing, and Deleting Notifications
  • Manage Companies
    • Registering, Editing, and Deleting Companies, and Bulk Registration
  • Manage Site
    • Viewing Site Settings
    • Editing Site Settings
    • List export for site capacity
  • Permitted IP Addresses
    • Permitted IP Addresses
  • Manage Roles
    • Role Persission List
    • Editing Roles
  • Manage Groups
    • Creating, Editing, and Deleting Groups
  • Managing Menus
    • Menus and Folders
    • Meta Options
    • Adding, Editing, and Deleting Meta Items
    • Restrict Menu Access
    • Restrict Folder Access
    • Download Request Settings
    • Download Request Authorizer Settings
    • Download Request Authorizer Removings
    • Cloud Storage Linkage
    • Settings for Cloud Storage Linkage
  • Manage Site Theme
    • Changing Site Theme
    • Setting Solution Link
  • Manage Input Fields
    • Adding Input Fields
    • Setting Required Input Fields
    • Eediting Selection Options
  • Maintenance Notifications
    • Maintenance Notifications
  • Viewing and Performing Actions on Mobile
    • Supported Actions on Mobile
    • Viewing on Mobile
    • Download on Mobile
    • Download Requests on Mobile
    • Sending on Mobile
    • Registering/Editing/Deleting Content on Movile
    • Registering/Editing/Deleting Sub-content on Movile
    • Registering Content by Non-Shelf Users on Mobile
    • Adding/Deleting Content as Favorites on Mobile
  • Workspace
    • What is Workspace?
    • Workspace Permissions
    • Basic Main Screen
    • Create/Edit/Delete Workspace
    • Add/Edit/Delete Folders
    • Label View
    • Content Registration and Deletion
    • Content Registration Requests
    • Copy and Move Content
    • Proofing Registration
    • Proof Comparison
    • Contents Comparison
    • Proofing Request to Non-shelf Users
    • Downloading/Sending/Creating PDFs
    • Share Page Link
    • Manage Users
    • Manage Site Theme
  • Archive
    • What is Archive?
    • Content Archive Registration
    • Site screen view for archive use
    • Restrictions on the use of archived content
    • How to check the status of archive usage
  • Linking shelf to custom service
    • Custom Service and Linking to Shelf
    • To Begin Using This Service
    • Using Stock Content
    • Managing Menus
    • Limitations
  • FAQ
    • Signing In
    • Searching and Viewing Content
    • Downloading and Sending
    • Registering/Editing/Deleting Content
    • Favorites
    • Download Request Settings
    • Manage Users
    • Access Restrictions
  • Inquiries
    • Inquiries
HOME  > Managing Menus
Managing Menus
Print
Menus and Folders
Print

Menus and Folders

On the Manage Menus page, you can set the below options for each menu/folder. Please see the respective pages for more information.

* Available to Site Managers only.
* For more information on creating menus/folders, please see Creating Menus/Folders.

Menus
Adding Meta Information Items
Setting Search Conditions
Showing/Hiding Meta Information Below the Menu Page Thumbnail
Access Restrictions
Displaying Meta Information
Download Request Settings

Folders
Access Restrictions


Close
Meta Options
Print

Meta Options


With Meta Options, you can set up meta items attached to content within each menu.

The following options are available for each meta item:


  • Show/hide below the menu page’s thumbnail image.
  • Show/hide in the advanced search window.
  • Item is required/not required.
  • Sort conditions on/off.
  • Show/hide API-use meta items (limited to user-created meta items).
  • With or without automatic translation (only if you use automatic translation function)


* If API-use is selected, it will not be displayed to users other than Site Managers.
* Administrator menu is available in Japanese and English only. If you select another language site, please log in again to the Japanese or English site.


Default Meta Options

  1. Click Administrator Menu from User Menu person icon  in the upper right of the screen, then click Manage Menus.
  1. A list of currently created menus will appear on the left side of the screen. Clicking the menu name will display a list of the meta items currently set to that menu.
    By default the below meta items will be displayed.
  • Content ID
  • Color Mode
  • Codec
  • File Name
  • File Size
  • Registered Date
  • Updated
  • Title
  • Access Period
  • Usage Period
  1. You can also set display options for each of these meta items.
    • If View List is selected, the meta item will be displayed below the thumbnail image in the list page.
      *In the list view, the items displayed are fixed by the system, and any additions will not be reflected. Please switch to thumbnail view to check the added meta.
    • If Search Options is selected, it will be displayed in the advanced search window and can be used as a search condition.
    • If Required is selected, the item will become required, and content cannot be registered without this item being filled in.
    • If Automatic translation is selected, the text entered in that meta will be automatically translated and reflected on each language site.
      *On/Off of the check can be changed only by the amana system administrator. Please contact us as needed.
      *Automatic translation is available in the meta format of text (single row)/text (with line breaks).
  1. Click Register to complete.


Close
Adding, Editing, and Deleting Meta Items
Print

Adding, Editing, and Deleting Meta Items


In Meta Options, Site Managers can also create and set meta items as desired.

* Administrator menu is available in Japanese and English only. If you select another language site, please log in again to the Japanese or English site.
* New meta items cannot be added to the amanaimages.com menu.


Adding User-created Meta Items

  1. Click Administrator Menu from User Menu person icon in the upper right of the screen, then click Manage Menus.
  1. A list of currently created menus will appear on the left side of the screen. Click a menu name to display a list of meta items currently set to that menu.
  1. Click the Create Meta button below the meta items.
  1. On the Add Meta Information window which appears, enter the input type of the meta item to be added.
    • If any of Text (alphanumeric), Text (single row), Text (with line breaks), Date, or Duration are selected, enter the label (the meta item’s name) and click the Add button.
    • If any of Pulldown, Radio Button, or Checkbox are selected, enter the label (item name) and create the selection item. If multiple selection items are necessary, click the Add Selection Items button and create these. Once this is complete click Add to complete.
      * The label (the meta item’s name)  can have a maximum of 50 characters.
      * Entries in text fields can have a maximum of 1000 characters.

*In case of using the automatic translation function
A [Translation] button will appear next to the Japanese/English field. The translated text based on the language in which this button is clicked will also appear in the other language fields. You can also modify each of them.

  1. Set the display options for the added item(s).
    • If View List is selected, the meta item will be displayed below the thumbnail image in the list page.
    • If Search Options is selected, it will be displayed in the advanced search window and can be used as a search condition.
    • If Required is selected, the item will become required, and content cannot be registered without this item being filled in.
    • If Sort Conditions is selected, the sort function items will be added and can be used. However, checkboxes cannot be set for sort conditions.
    • If For API is selected, it will not be visible or usable to any users except for Site Managers.
    • If Automatic translation is selected, the text entered in that meta will be automatically translated and reflected on each language site.
      *On/Off of the check can be changed only by the amana system administrator. Please contact us as needed.
      *Automatic translation is available in the meta format of text (single row)/text (with line breaks).
  1. Click Register.


Sorting Added Meta Items

On the Manage Menus page, click the ▲▼ buttons to change the order in which meta items are shown. Click Register to complete.


Editing Added Meta Items

  1. On the Manage Menus page, click the pencil icon next to the meta item you want to edit.
  1. Edit the fields as desired on the Edit Meta Information window which appears, and click Register.

*In case of using the automatic translation function
A [Translation] button will appear next to the Japanese/English field. The translated text based on the language in which this button is clicked will also appear in the other language fields. You can also modify each of them.

  1. Click Register once more on the Manage Menus page to complete.


Grouping Meta Items

You can set lines above and below the meta items you have created and view the meta items between them as a group.
Grouping allows each group to be opened and closed on content information page.

  1. On the manage menus page, click on  person icon next to the meta item, and then a line will appear at the top.
  1. When prompted to confirm the group, continue by clicking on person icon next to the meta item that will be the end of the group.
    To cancel the line which indicates the beginning of a group, click on ✕ button next to the line.
  1. Once the beginning and ending lines are set, a group name can be entered. Click on […] next to the meta group, select [Edit], enter any name, and then click [Register].
  1. Click ▼▲ next to each meta item to replace the meta item within the line. Metas included within the beginning and ending lines of the group are grouped together.


  1. Click [Register] on the manage menus page to complete.

*New registration of meta item cannot be allowed while setting a group.


Editing a Group of Meta Items

  1. When you edit the metagroup name, Click on […] next to the meta group, select [Edit], enter any name, and then click [Register].
  1. Click ▼▲ next to each meta item to replace the meta item within the line. Metas included within the beginning and ending lines of the group are grouped together.


  1. Click [Register] on the manage menus page to complete.


Deleting Added Meta Items

  1. On the Manage Menus page, click the X icon next to the meta item you want to delete.
  1. Click Register to complete.


【Bulk Registration of Meta Items】

You can export the created meta items and settings as a list, and bulk edit or bulk register in other menus.
Please refer to Importing/Exporting Lists for the details.

* Grouping of meta items cannot be edited in bulk registration.


Close
Restrict Menu Access
Print

Restrict Menu Access


With access restrictions, you can set user groups in order to restrict access to certain menus, folders, or added meta information items.

* User groups need to be set beforehand. For more information on user groups, please see Manage Groups.

*Administrator menu is available in Japanese and English only. If you select another language site, please log in again to the Japanese or English site.


Setting Access Restrictions

  1. Click Administrator Menu from User Menu person icon  in the upper right of the screen, then click Manage Menus.
  1. A list of menus and meta items currently set will be displayed. Click the name of menus to which you want to restrict access.
  1. Click the Access Restrictions tab to open the settings page.

Access settings that can be configured across menus include restrict Menu Access and restrict Meta Access.

  • Restricting Menu Access
    If Restrict Menu Access is selected, menus will not be shown, and cannot be accessed by any users other than Site Managers.
    The menu will then appear to users in that group, and they will be able to access it.If you want to allow access to only a specific group or groups, select those groups using the checkbox next to the group name.


    The category will not be displayed to other groups or users not belonging to a group.
  • Restricting Meta Access
    This is used to restrict meta item to be shown to the site administrator and/or to groups other than specific groups.


    First, tick [Restrict Meta Access] option.
    Then, tick in [Group], tick any groups for which you do not want to restrict the viewing of meta item. All meta items are visible in the selected group, regardless of the meta item’s access restriction settings.
    Finally, tick in [Restricted Items] option, tick any meta items you want to hide from view.
    This allows you to hide meta items selected in [Restricted Items] for groups (and users who do not belong to any group) that have not been selected in [Groups].

* Meta access restrictions are based on menu access restriction settings. If a menu is not accessible, that menu’s meta items will also not be visible.
* Meta access restrictions apply only to user-added meta items.

  1. Click Register to complete.


Close
Restrict Folder Access
Print

Restrict Folder Access


As with menus, access to folders can also be controlled.

* User groups need to be set beforehand. For more information on user groups, please see Manage Groups.

* Administrator menu is available in Japanese and English only. If you select another language site, please log in again to the Japanese or English site.


Setting Access Restrictions

  1. Click Administrator Menu from User Menu person icon  in the upper right of the screen, then click Manage Menus.
  1. A list of menus and meta items currently set will be displayed. Click ▲ to expand the menu’s categories, and click the name of the folder to which you want to restrict access.
  1. If Restrict Folder Access is selected, folders will not be visible and cannot be accessed by any users other than Site Managers.
    If you want to allow access to any user in addition to the site administrator, check the box next to the group name. The users who belong to the checked groups will see folder(s) and will be able to access it. It will be hidden from other groups and from users who do not belong to any group.
  1. Click Register to complete.


* Folder access restrictions are based on the access restriction settings of the menu/folder to which it belongs. If a menu/folder is not accessible, folders nested under it will also not be visible.

Close
Download Request Settings
Print

Download Request Settings


With download request settings, you can set whether or not an authorizer’s approval is required when downloading.

Settings are applied on a per-menu basis. If the request feature is enabled, when an item of content is uploaded to the applicable menu, you can specify whether or not a request is required to download that item.


Enabling Download Requests

  1. Click Administrator Menu from User Menu person icon  in the upper right of the screen, then click Manage Menus.

*Administrator menu is available in Japanese and English only. If you select another language site, please log in again to the Japanese or English site.

  1. A list of menus and meta items currently set will be displayed. Click the name of the menu to which you want to apply download request settings.
  1. Click the Download Request Settings tab to open the settings page.
  • If Use Download Request Settings on This Menu is selected, the registering user will be able to specify whether or not a download request is required to download that content.

* For more information on how to set download request authorizers, please see Download Request Authorizer Settings.

  • If Require Request by Default is selected, the Request Required checkbox will always be selected by default when registering.

* Download request requirement can be toggled from the edit page for individual content items.


  1. Click Register to complete.

* If download requests are enabled on a menu to which content has already been registered, any content registered up to that time will be set to not require a download request by default.  This can be changed to require a download request from the edit page of each item of content.


Changing Request Requirements Per Content


To enable or disable download requests for individual content items, select or clear the Download Request checkbox when registering or editing the item.


  1. Select the content to be edited via ≪dragging and dropping≫, or ≪using the checkboxes≫.
  1. From the edit page of the selected content, select the Download Request checkbox to require download requests, or clear the checkbox to disable this feature.


To allow users other than Site Managers to manage this, the following permissions need to be set.

  1.  Click Administrator Menu from User Menu person icon  in the upper right of the screen, then click Manage Roles.
    *Administrator menu is available in Japanese and English only. If you select another language site, please log in again to the Japanese or English site.
  1. In the role of the user to which you want to grant the permission to manage requirement of download requests, select the checkbox for Manage[Download Request Settings]
  1.  Click Register to complete.

* In order to use the Download Request feature, please contact your sales representative or Amana systems administrator.

Close
Download Request Authorizer Settings
Print

Download Request Authorizer Settings


Download request authorizer can be set per menu, or per item of content.

On the Manage Menus page, an authorizer can be set per menu by selecting the Use Download Request Settings on This Menu checkboxes, or specified per individual content item.

*Please note that download requests cannot be made if an Authorizer is not set.
* Administrator menu is available in Japanese and English only. If you select another language site, please log in again to the Japanese or English site.


Setting Authorizer Per Menu

  1. Click Administrator Menu from Options person icon in the upper right of the screen, then click Manage Menus.
  1. Select the Download Request Settings tab, then with the Use Download Request Settings on This Menu checkbox selected, select Set Authorizer Per Menu.
  1.  From Set Download Request Authorizer, click Add New User.
  1. Search for and select the user you want to add as an authorizer, then click Add.
    Users who can be set as authorizers are limited to Site Manegers and roles which have the Approve Download Requests permission enabled.
    * Users be searched by user name, company name, department name, or role. For multilingual sites, the search text will be in Japanese/English as set when registering as a user.
  1. Click Register to complete.

*To add additional authorizers, repeat steps 3 to 5.


Setting Authorizer Per Content

  1. Click Administrator Menu from Options person icon in the upper right of the screen, then click Manage Menus.
  1.  Select the Download Request Settings tab, then with the Use Download Request Settings on This Menu checkbox selected, select Set Authorizer Per Content.
  1. For individual content items which require a download request, you can set the authorizer from the edit page. From Set Download Request Authorizer, click Add New User.
  1. Search for and select the user you want to add as an authorizer, then click Add.
    Users who can be set as authorizers are limited to Site Manegers and roles which have the Approve Download Requests permission enabled.
    * Users be searched by user name, company name, department name, or role. For multilingual sites, the search text will be in Japanese/English as set when registering as a user.
  1. Click Register to complete.

*To add additional authorizers, repeat steps 3 to 5.


*Authorizer settings are shared across old and current versions of content; changing an authorizer on the current version of a content item will also change the previous version(s).


Allowing users other than Site Managers to act as download request authorizers can be performed in the Manage Roles permissions settings.

  1. Click Administrator Menu from Optionsperson icon in the upper right of the screen, then click Manage Roles.
  1. In the role of the user to which you want to grant the permission to manage requirement of download requests, select the checkbox for Manage[Approve Download Requests]
  1. Click Register to complete.

*Note that this setting will apply to all users in that role. Before making this change, we recommend checking other users with the same permissions from the Manage Users menu.
To limit this permission to a select group of users, you can create a new role, and register the desired users to this.


*For more information on the process of approving/rejecting requests, please see Approving/Rejecting Requests section of Download Requests.

*In order to use the Download Request feature, please contact your sales representative or Amana systems administrator.

Close
Download Request Authorizer Removings
Print

Download Request Authorizer Removings


Download request authorizer can be removed per menu, or per item of content.

*Please note that download requests cannot be made if an Authorizer is not set.
*Authorizer settings are shared across old and current versions of content; changing an authorizer on the current version of a content item will also change the previous version(s).

*Administrator menu is available in Japanese and English only. If you select another language site, please log in again to the Japanese or English site.


Removing Authorizer Per Menu

  1. Click Administrator Menu from User Menu  person icon in the upper right of the screen, then click Manage Menus.
  1. Select the menu from which you want to remove an authorizer, then click the Download Reqeust Settings tab.
  1. From Set Download Request Authorizer, select the checkbox for the user you want to remove as authorizer, then click Delete.
  1. Click Register to complete.

Removing Authorizer Per Content

  1. Enter edit mode for the content for which you want to remove the authorizer.
  1. From Set Download Request Authorizer, select the checkbox for the user you want to remove as authorizer, then click Delete.
  1. Click Register to complete.
Close
Cloud Storage Linkage
Print

Cloud Storage Linkage


Cloud Storage Linkage is a function that automatically transfers master content registered in shelf to cloud storage servers used individually by our customer.
Sites using this function can be set to be linked or not for each menu.

Once the content is registered in shelf, the master content is automatically transferred to cloud storage at regular intervals.
When the linkage is completed, a button will appear on menu page and Content Information Page with a link to cloud storage, and clicking the button will move to the relevant content page on cloud storage.


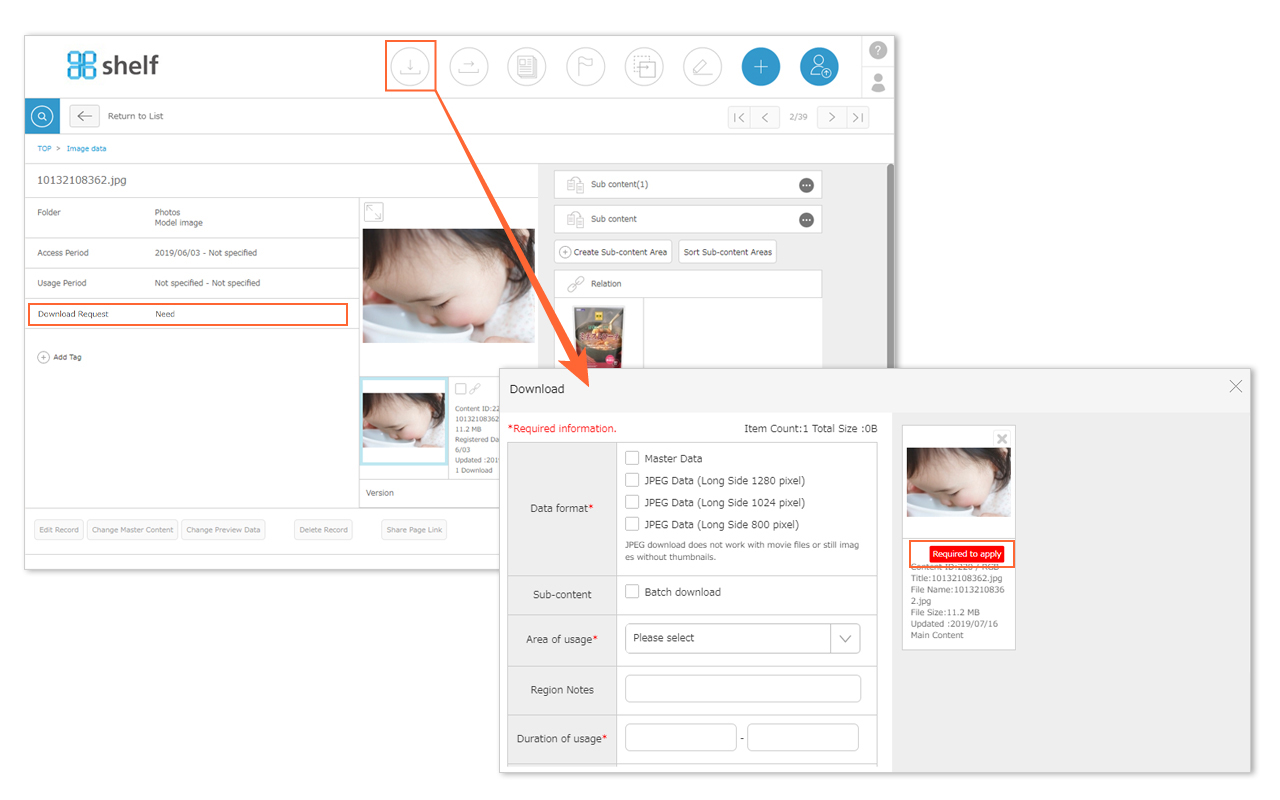
*The link button is available to any shelf user, regardless of their permissions.
*After you click the link button to move to the cloud storage, the login page will be shown if you have not yet logged in to the storage system.
Only users who have an account on the storage side can log in to the storage.

An application is required to use Cloud Storage Linkage function. If you would like to use this service, please contact the following for further information. Our sales representative will contact you shortly.
shelf-info@amana.jp


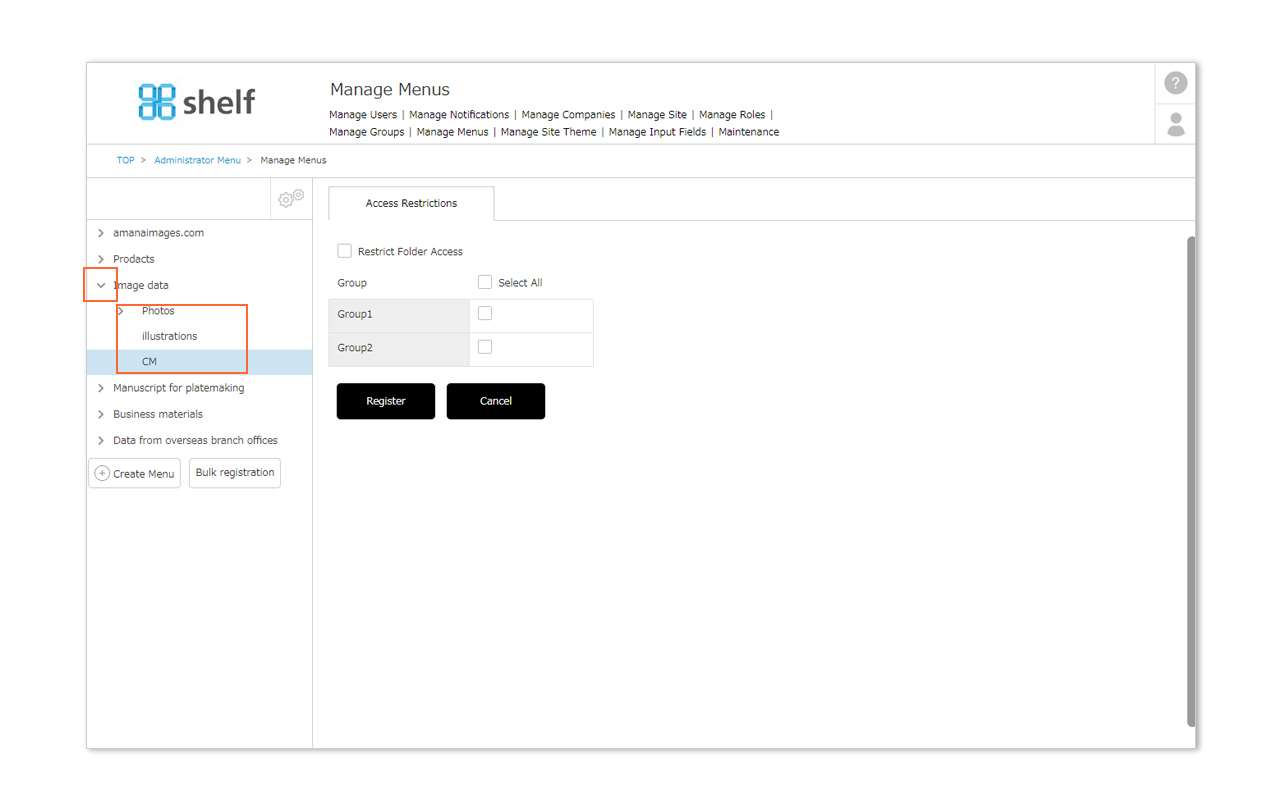
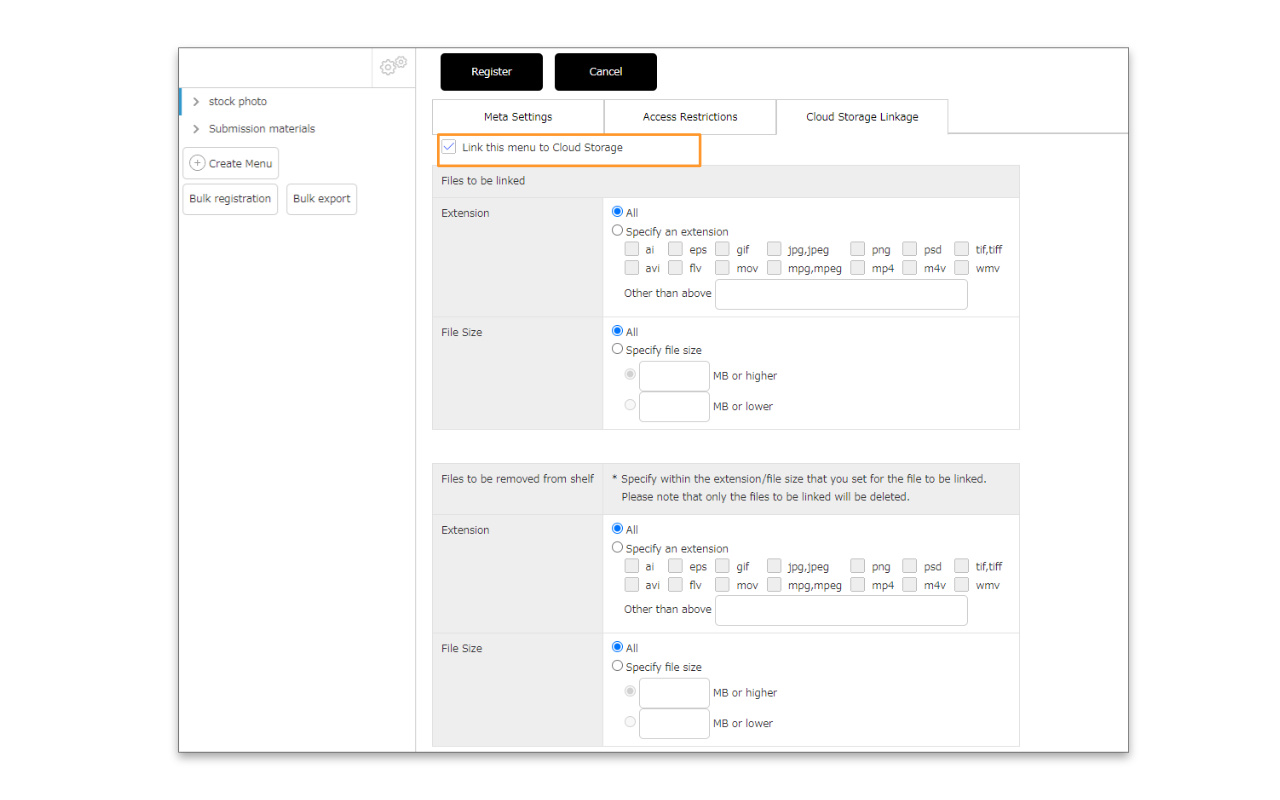
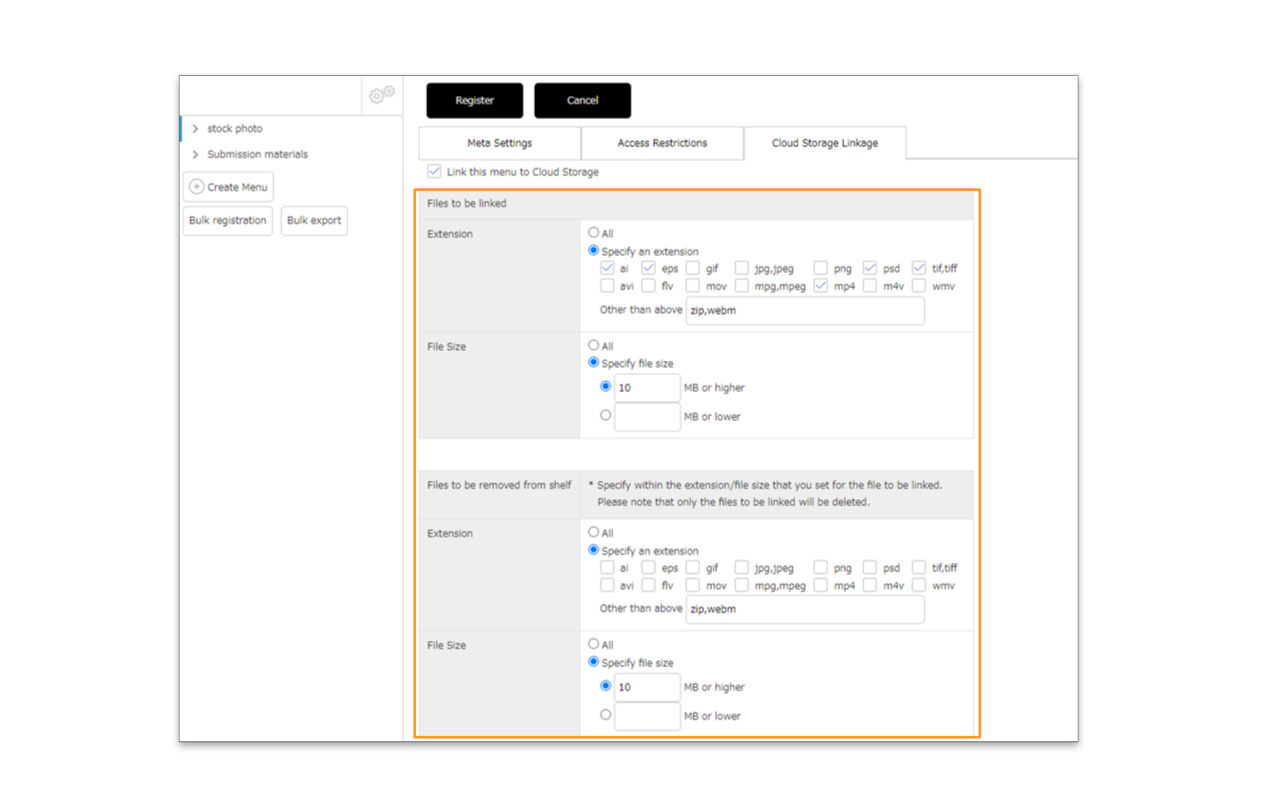
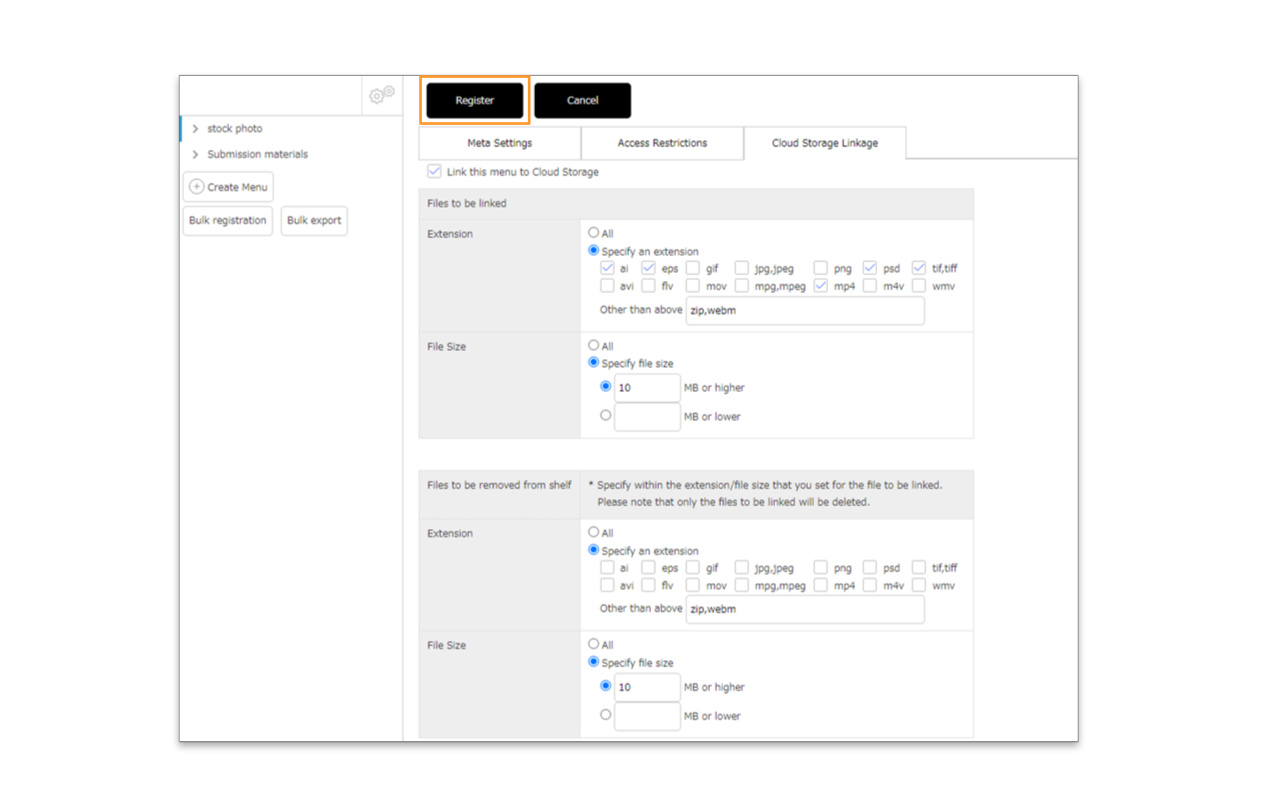
Storing content on the cloud storage side

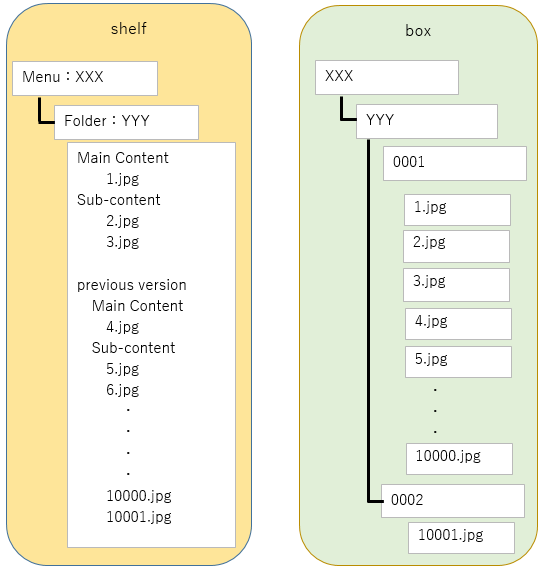
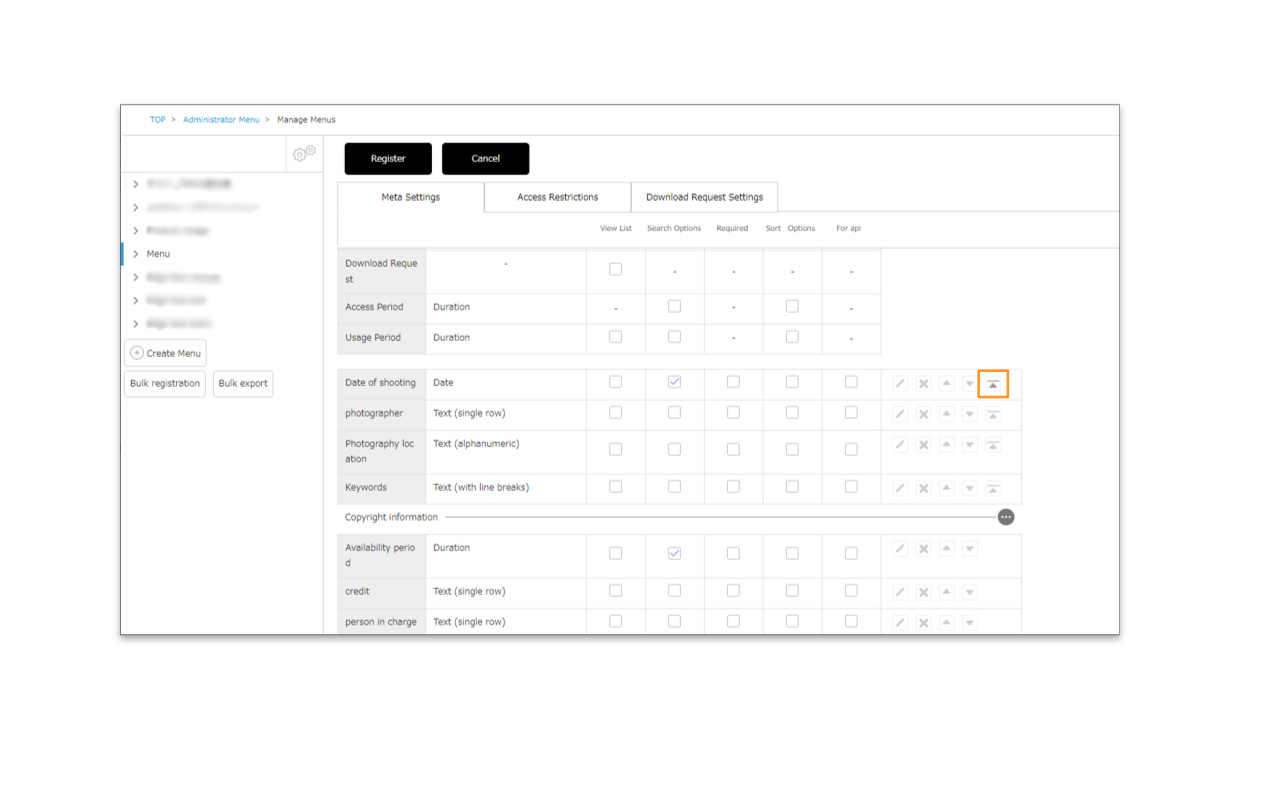
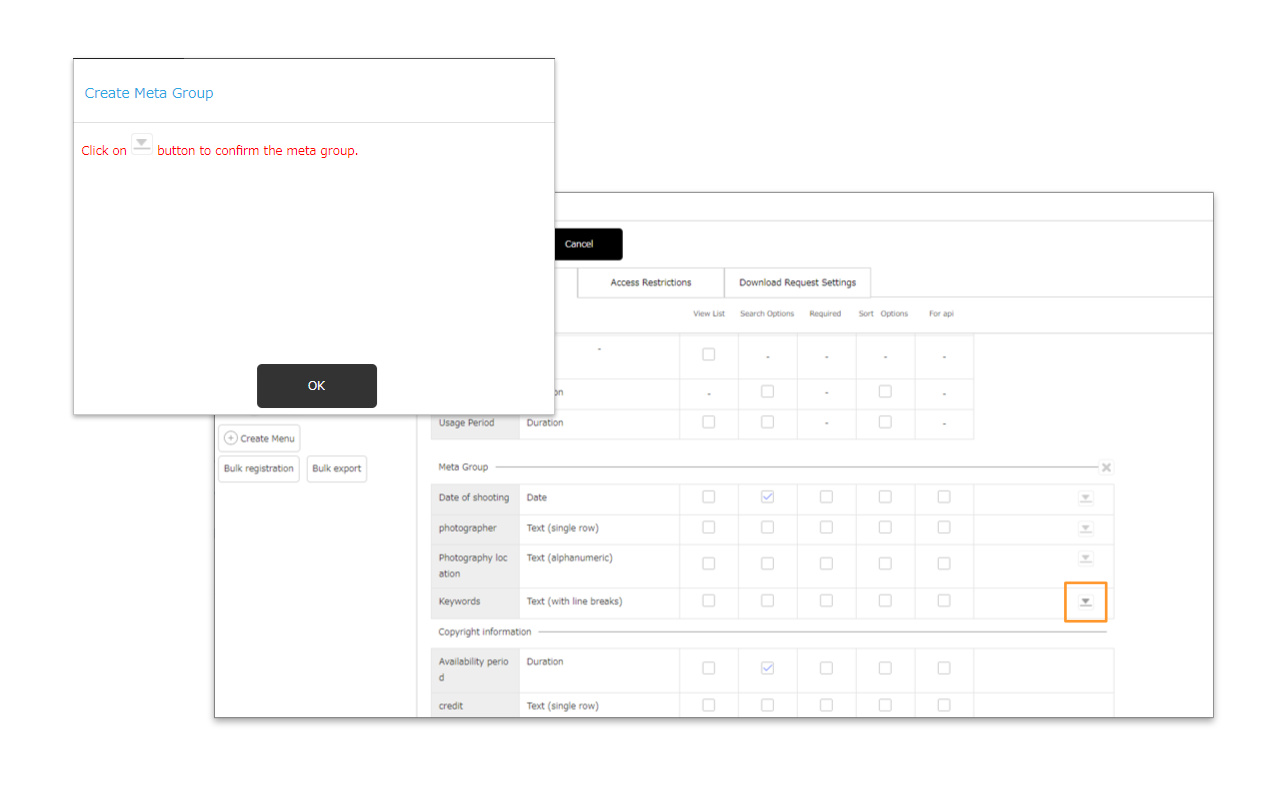
When the target content is linked for the first time, a menu/folder with the same name as shelf will be created on the cloud storage side, and the master content will be automatically stored there.

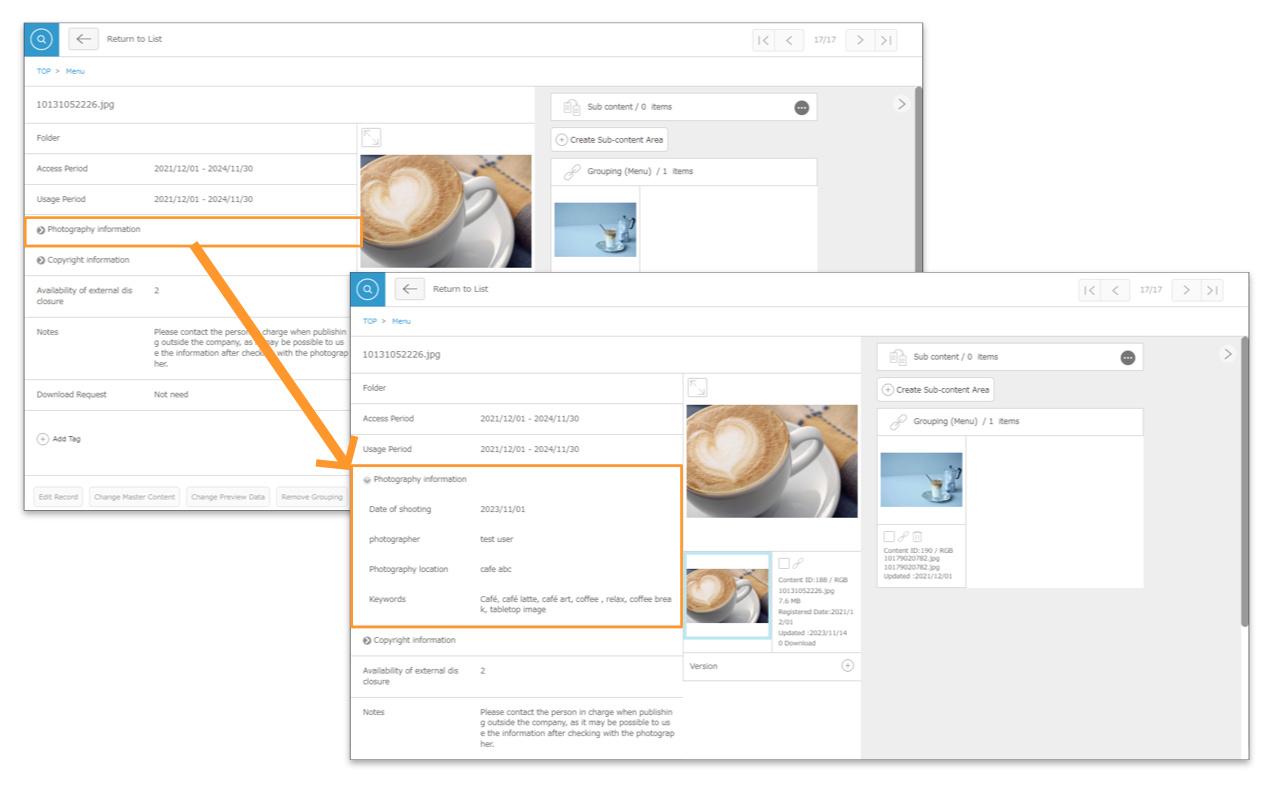
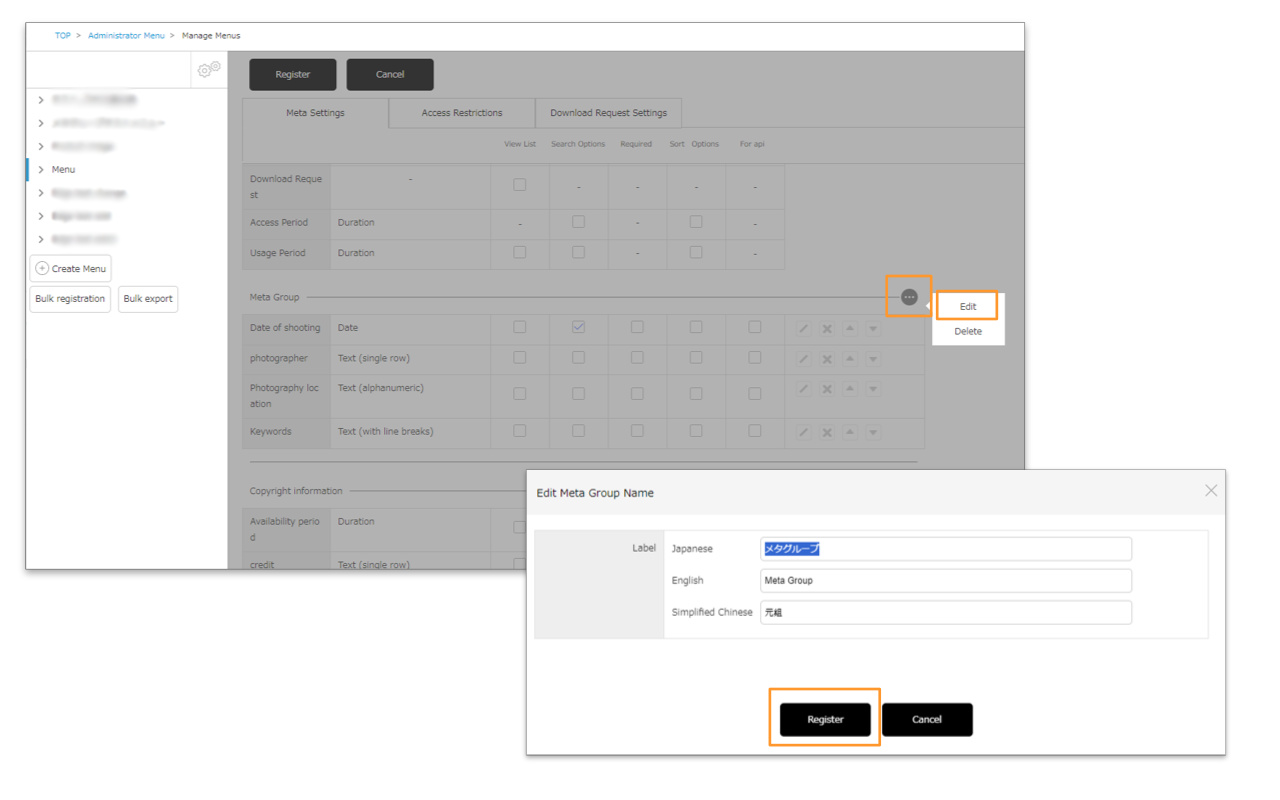
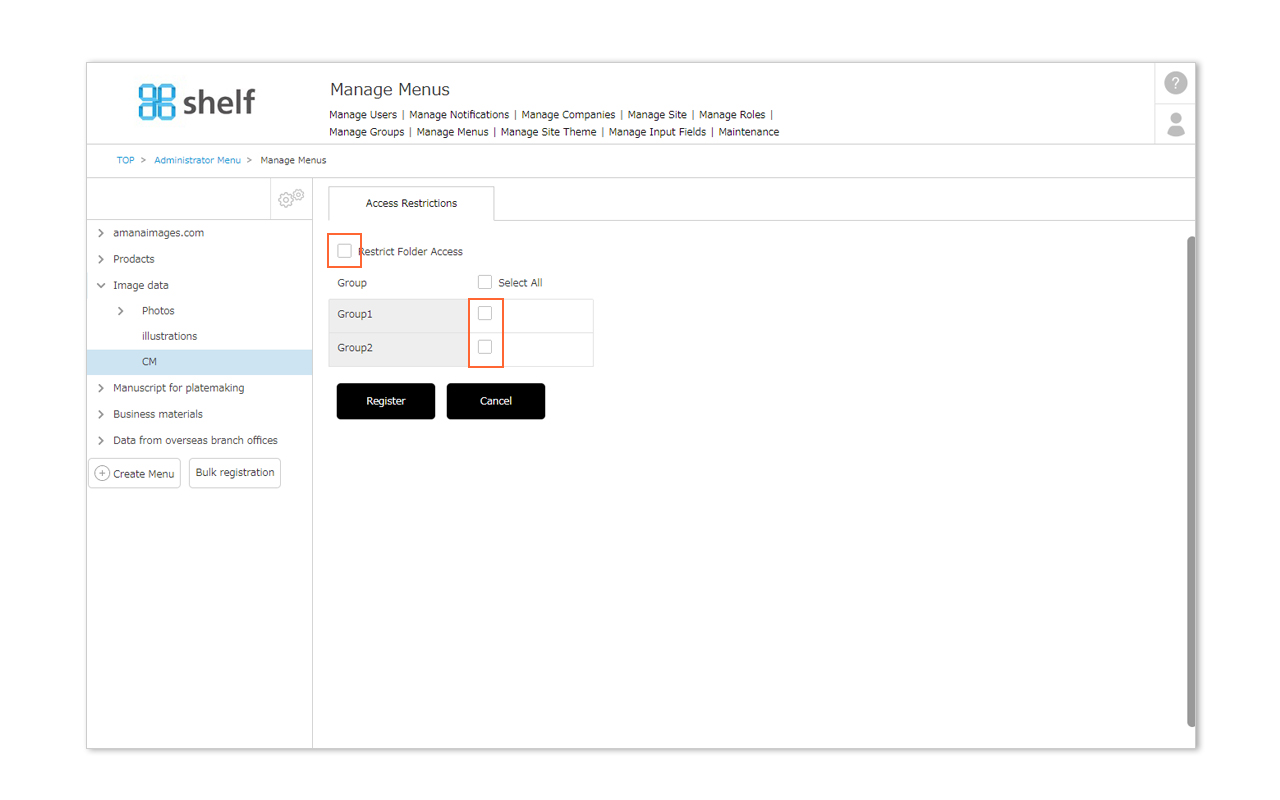
Please note that the main content, subcontent, version, etc., which were shown together on one page as related data of the main content on shelf site, will be stored in the same menu/folder, but the relationship between them will not be explicitly shown on the cloud storage.

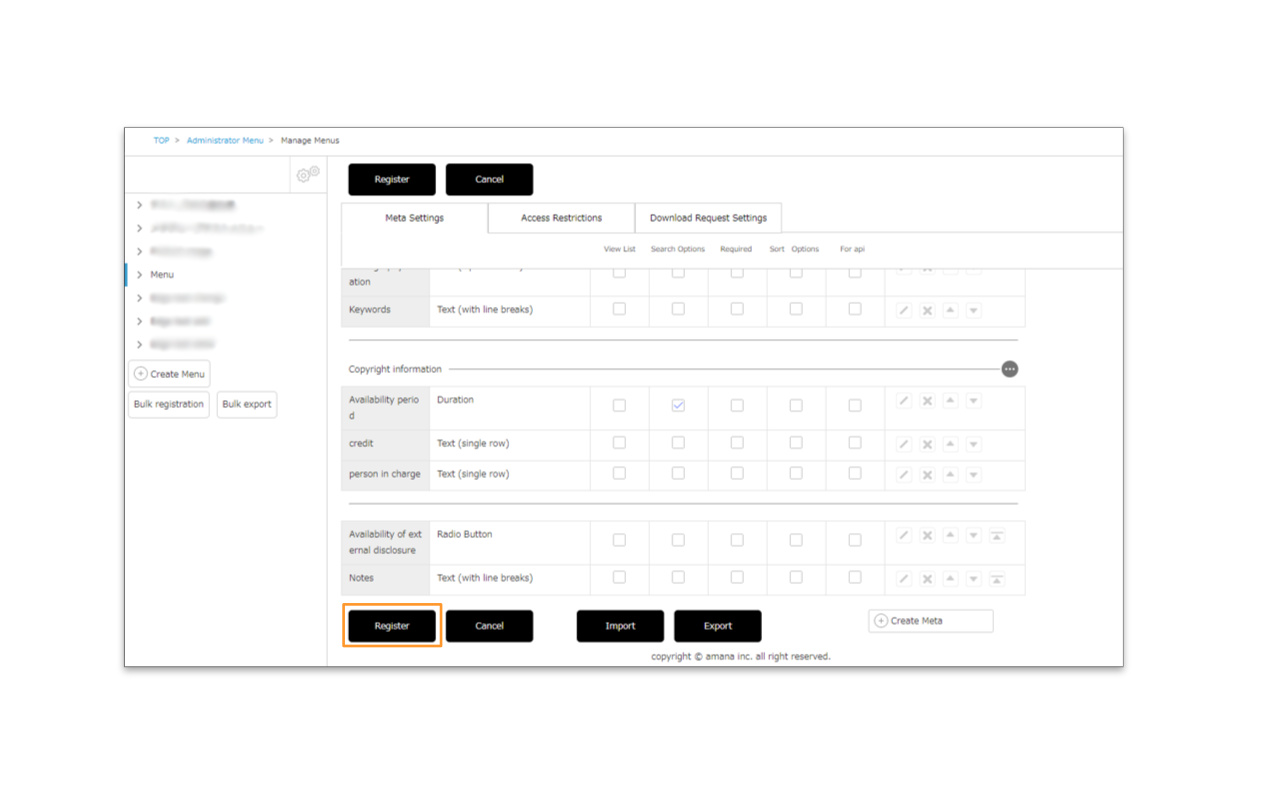
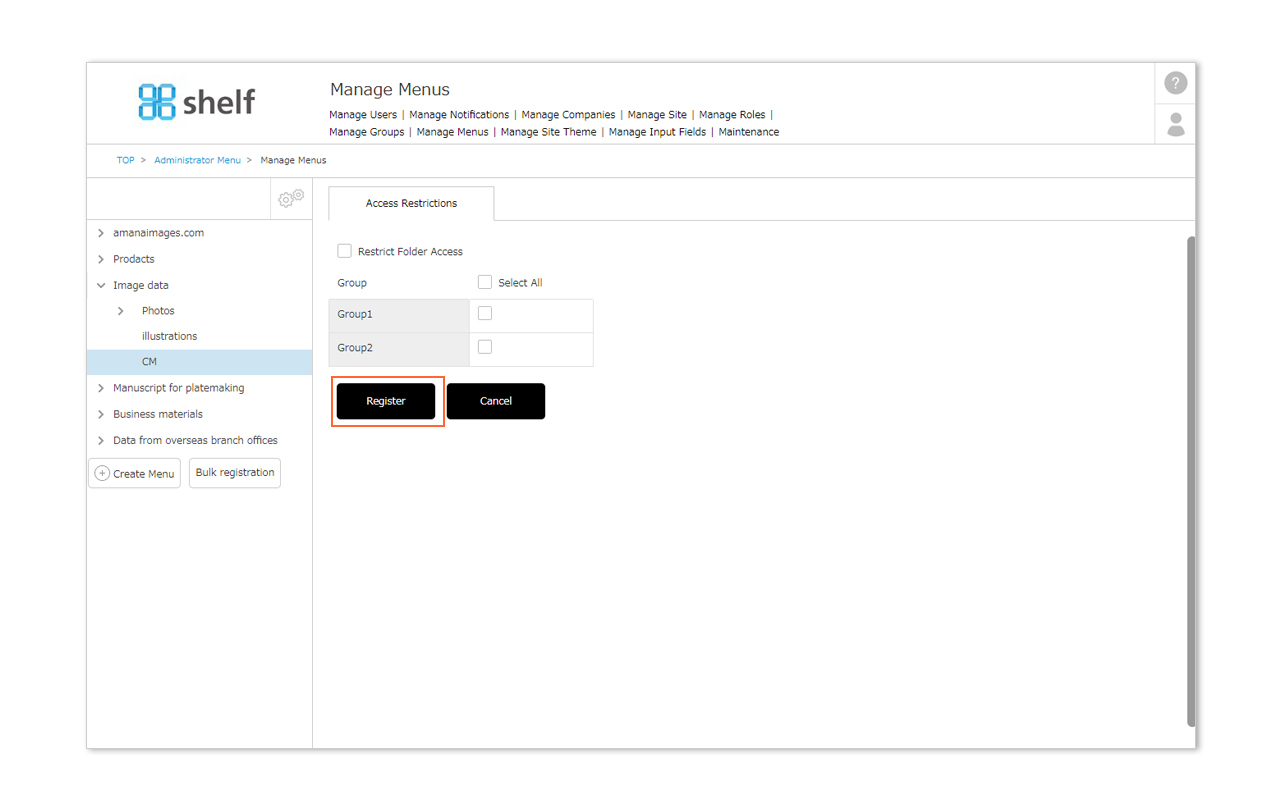
*In the case of Box linkage, content will be stored as shown below, separated by one folder for each 10,000 data.

icon

Close
Settings for Cloud Storage Linkage
Print

Settings for Cloud Storage Linkage


Sites using this function can be set to be linked or not for each menu.

*Administrator menu is available in Japanese and English only. If you select another language site, please log in again to the Japanese or English site.


Settings for Cloud Storage Linkage

  1. Click Administrator Menu from User Menu in the upper right of the screen, then click Manage Menus.
  1. Select the menu item you want to link and click [Cloud Storage Linkage] tab.
  1. Tick [Link this menu to Cloud Storage] option.
  1. Then, set up the target file.
    In [Files to be linked], you can set the file extension and file size that you want to link to the cloud storage. Files that meet both conditions will be eligible.
    .
    * Please enter the name of the extension such as txt in [Other than the above]. Multiple extensions can be set by separating them with single-byte commas.
    * In [Files to be deleted from shelf], you can set the file extension and file size delete the master content from shelf after linking to cloud storage.
    Files that have been linked to storage and meet both the extension and size requirements will be eligible.
    * Extensions and sizes that are not set in [Files to be linked] will not be deleted even if they are selected as deleted files.
    * Please enter the name of the extension such as txt in [Other than the above]. Multiple extensions can be set by separating them with single-byte commas.
  1. Click [Register] to complete.

Linkage is executed in a batch process at the timing determined upon contract. It is not linked immediately after the content is registered.


* If you tick the linkage option with content already registered, those registered content will also be linked to the site.

*If you have unticked the linkage option or if the linkage contract period has been expired, the link button for the linked contents will still be shown and you will be transferred to the relevant contents in the cloud storage by clicking on this button.


About automatically sent email for linkage errors

If the linkage capacity is exhausted, or if the linkage to cloud storage fails for some reason, an automatic email will be sent to contact person responsible for the contracted company to inform them of the linkage error.

Please check our email notification.


Close

© amana inc.