- When the Workspace window appears, click the “Create Workspace” button at the bottom.
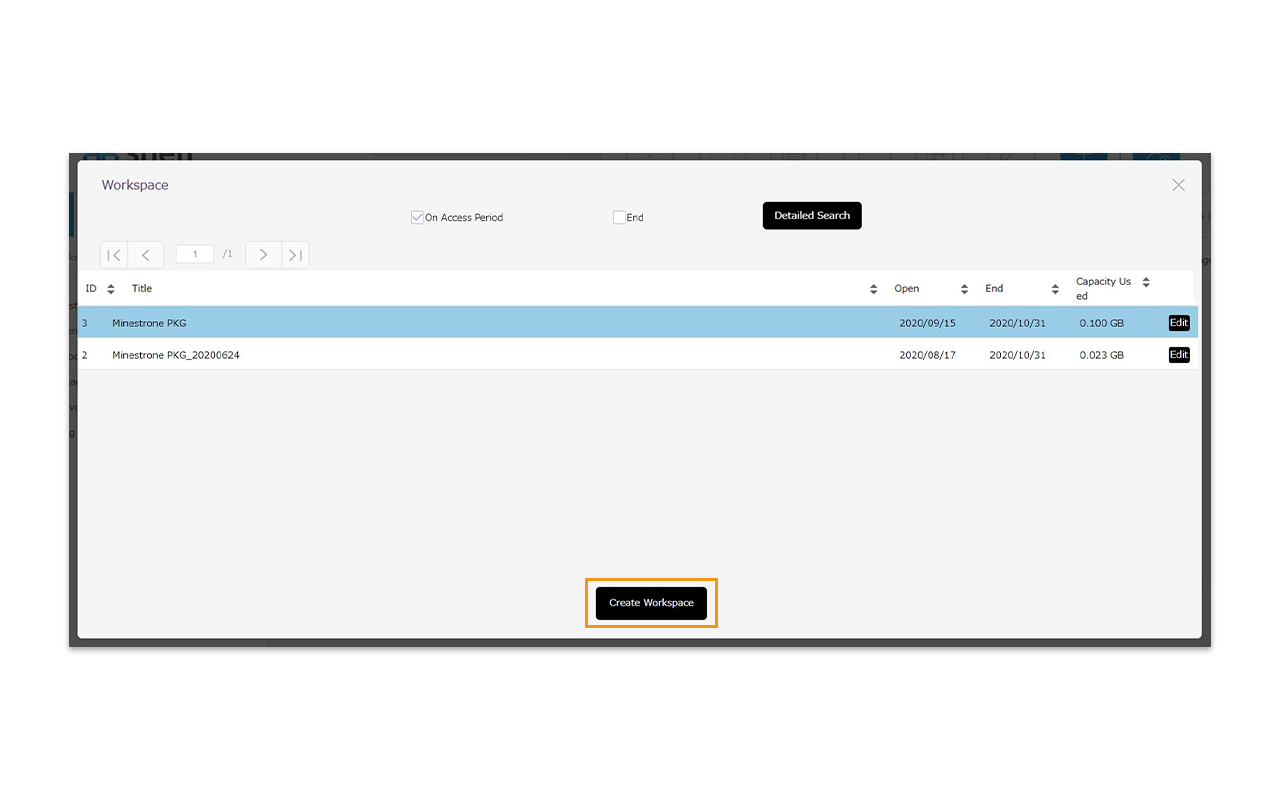
- Set workspace.
-
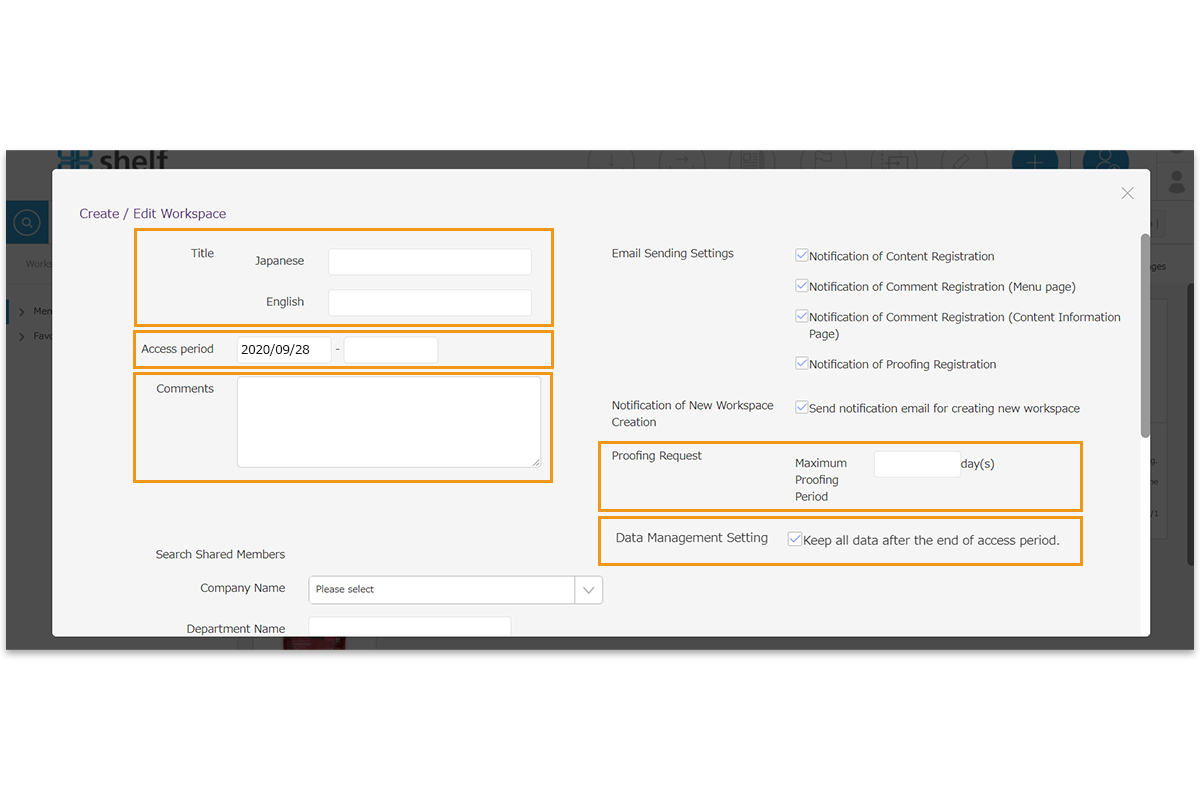
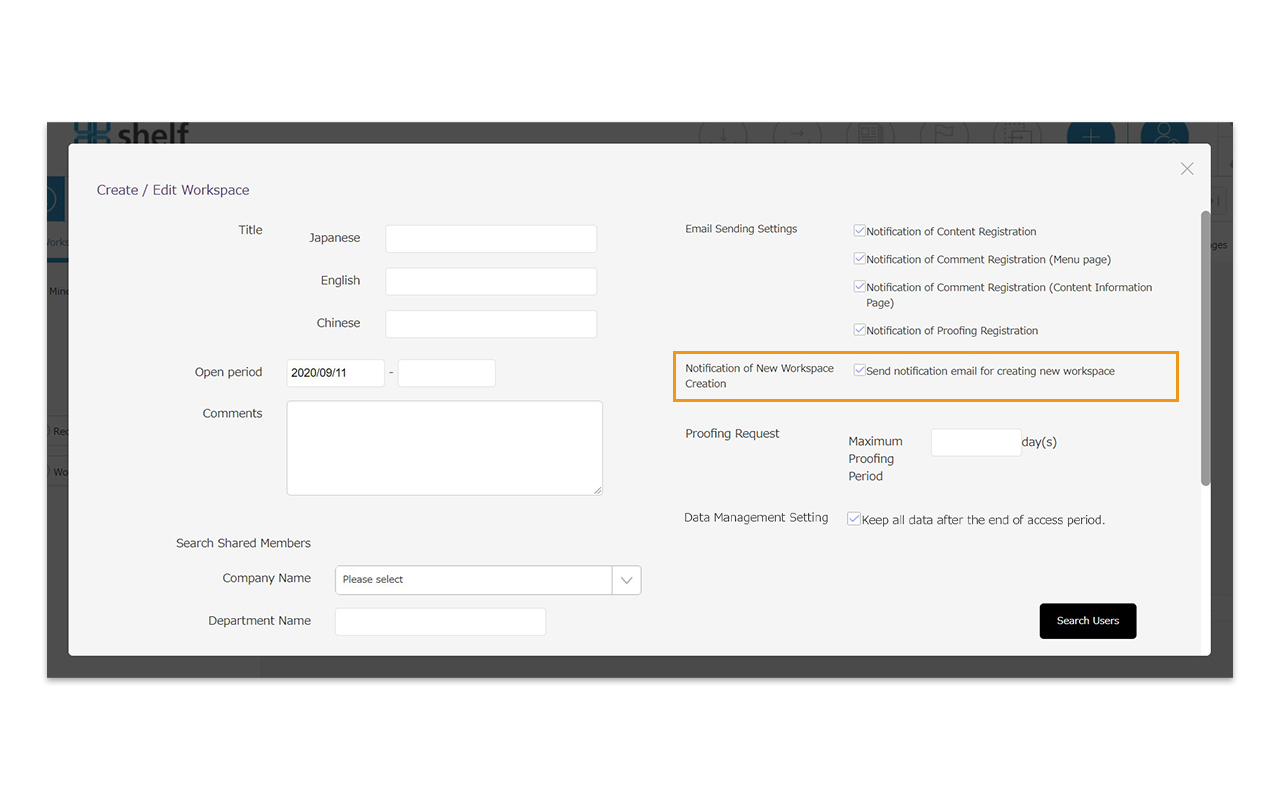
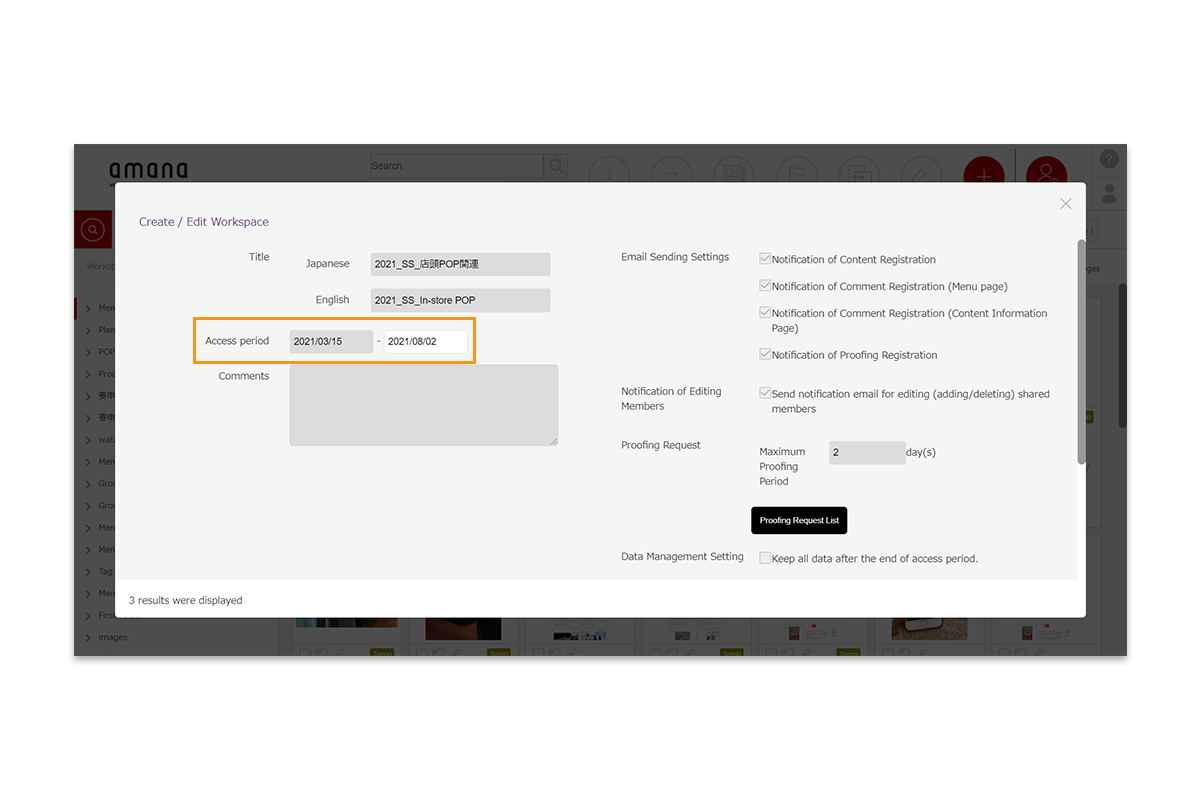
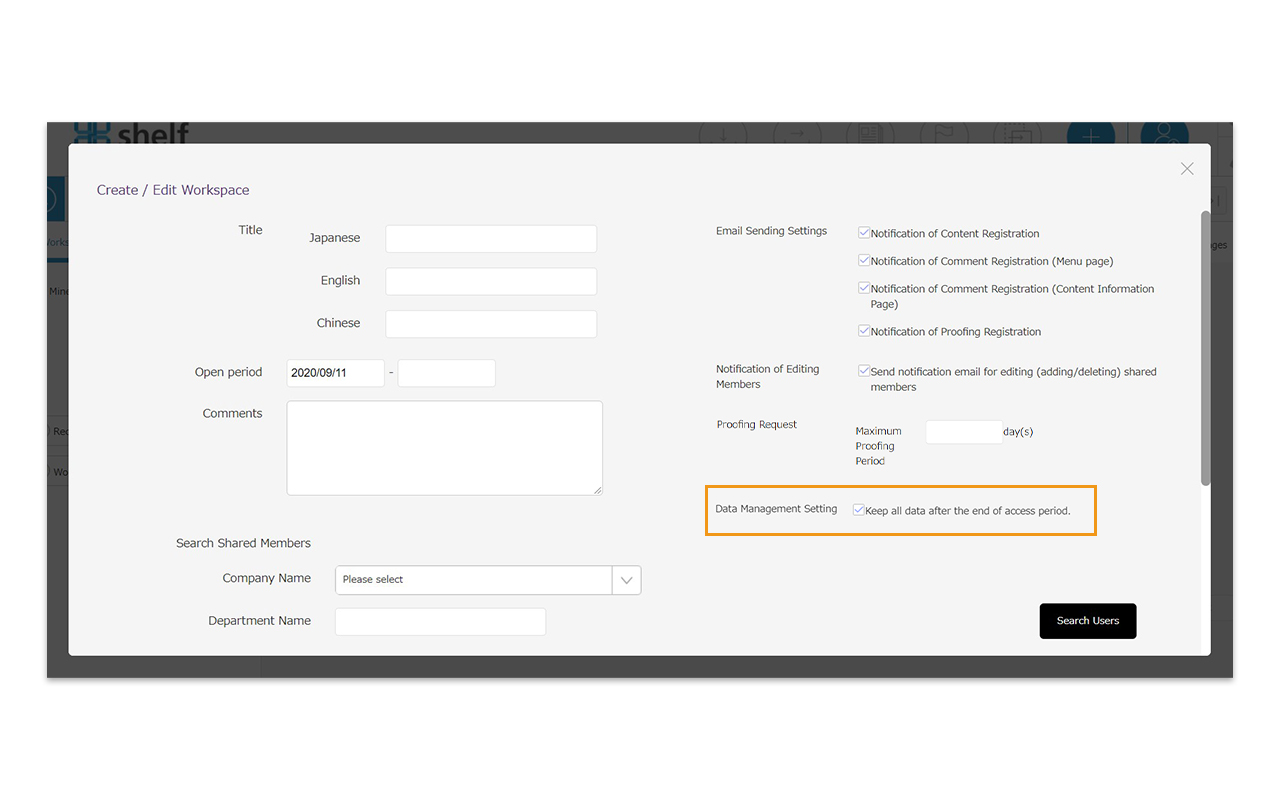
- Title/Open Period/Comments
The title and open period are required, and entering a comment is optional. - Email Sending Settings/Notification of New Workspace Creation
If this setting is turned ON, notifications for new content or comments will be sent to members.
*Notifications for the creatioAn of a new workspace and the editing (adding/removing) of shared members will always be sent to the relevant users, regardless of this setting. Additionally, you can choose whether or not to send these notifications for each individual user by toggling their respective checkboxes. - Proofing Request
Enter the maximum number of days to set the maximum proofing period for the proofing request. Please refer to [Proofing Request to Non-shelf Users] for the details about the proofing request. - Data Management Setting
If you check the “Keep all data after the end of access period.” checkbox in Data Management Setting, you will be able to access workspace even after one month from the end of the access period. The icon will be shown only for the content that is currently being requested for proofing, and will disappear when the request period ends.
If you do not check this box, workspace will be automatically deleted after one month from the end of the access period. For more details, please refer to [Delete Workspace].
- Title/Open Period/Comments
* For multilingual sites, Japanese/English setting fields are displayed for Title, and settings for two languages can be available.
If you log in to non-Japanese language sites, those set to [English] will be displayed. If you use the automatic translation function, a [Translation] button will appear, and clicking it will display the translated text. You can also modify the text.

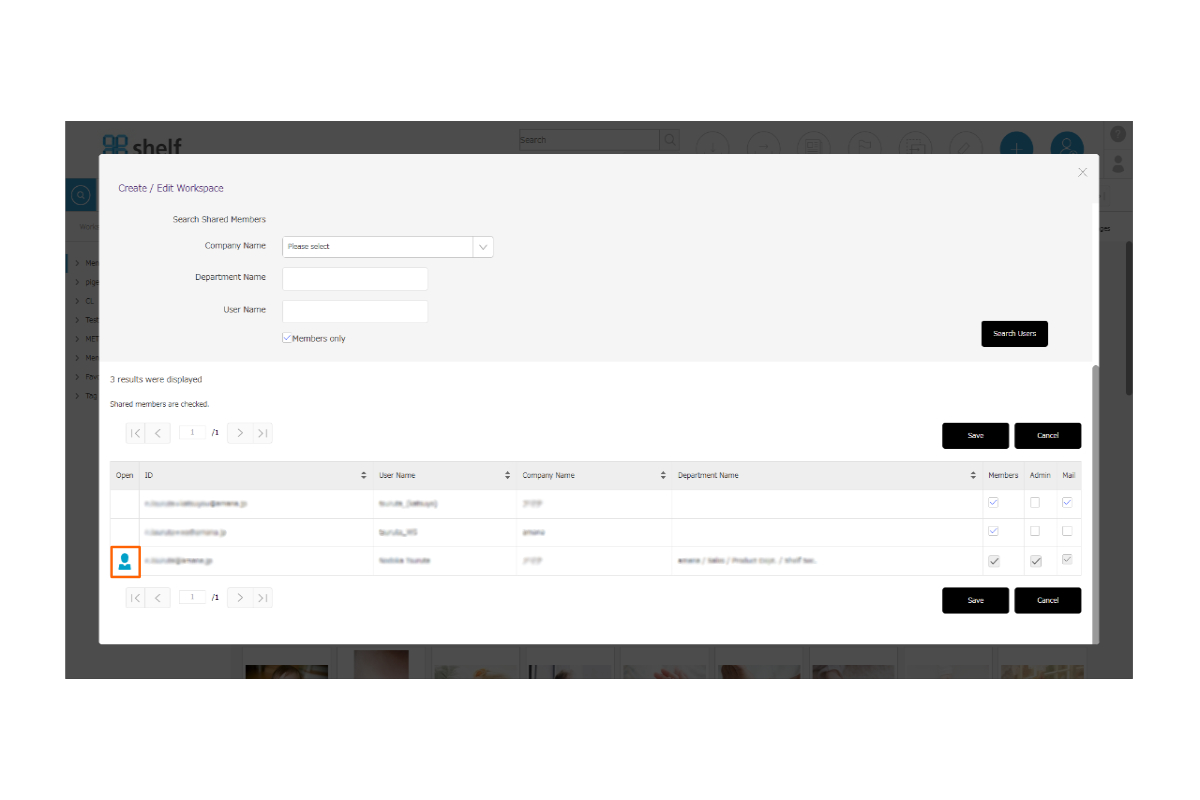
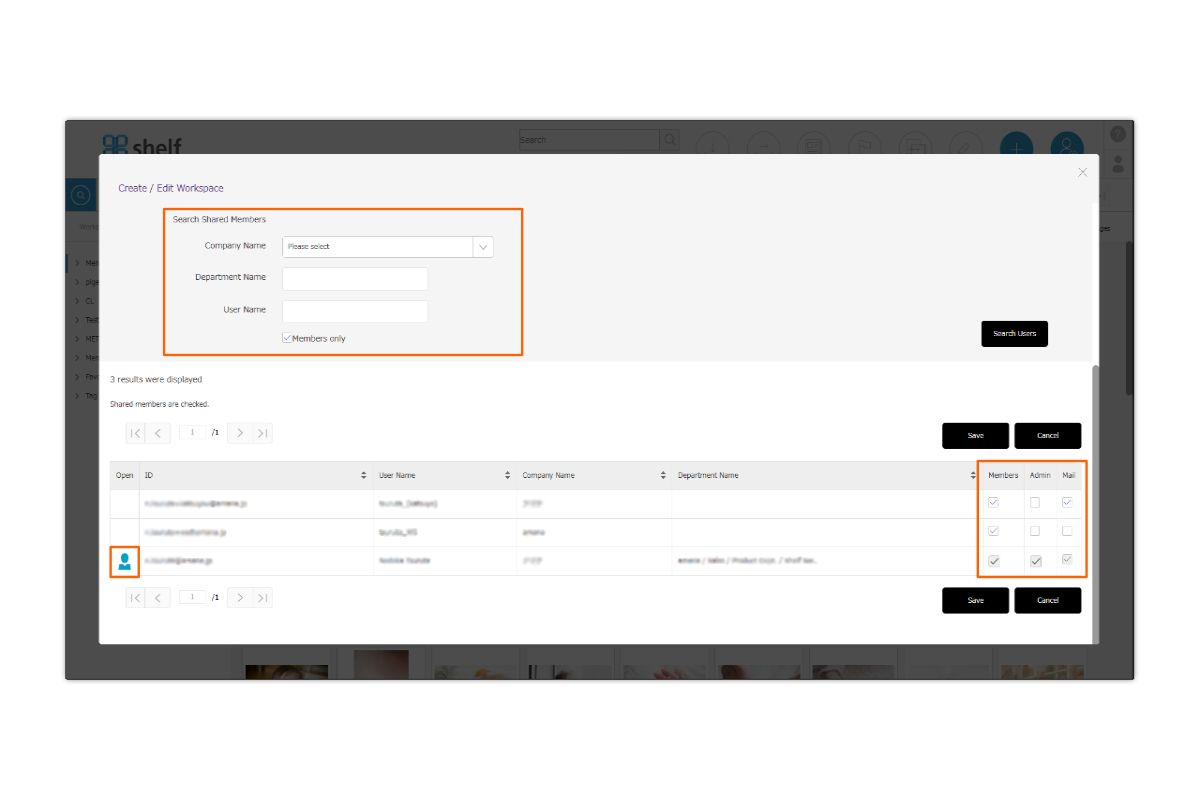
- Select a member and click the Create button to create a workspace. You can search for the members you want to register in Workspace with [Search shared members].
Tick the [Member / Administrator / Email] checkboxes on the right side of the search result list. Select the appropriate access
permission you want to give to each member. A workspace will be created upon clicking the [Create] button,
at which time a notification email will be sent to all registered members. (Please note that this notification will be sent regardless of the Email Sending Settings.)
*Workspace members can be selected from among the users who are initially registered in shelf and are allowed to use workspace. If the user you want to add does not display, please check [Library and Workspace Setting] under User Details in Manage Users.
* For multilingual sites, the search text will be in Japanese/English as set when registering as a user.
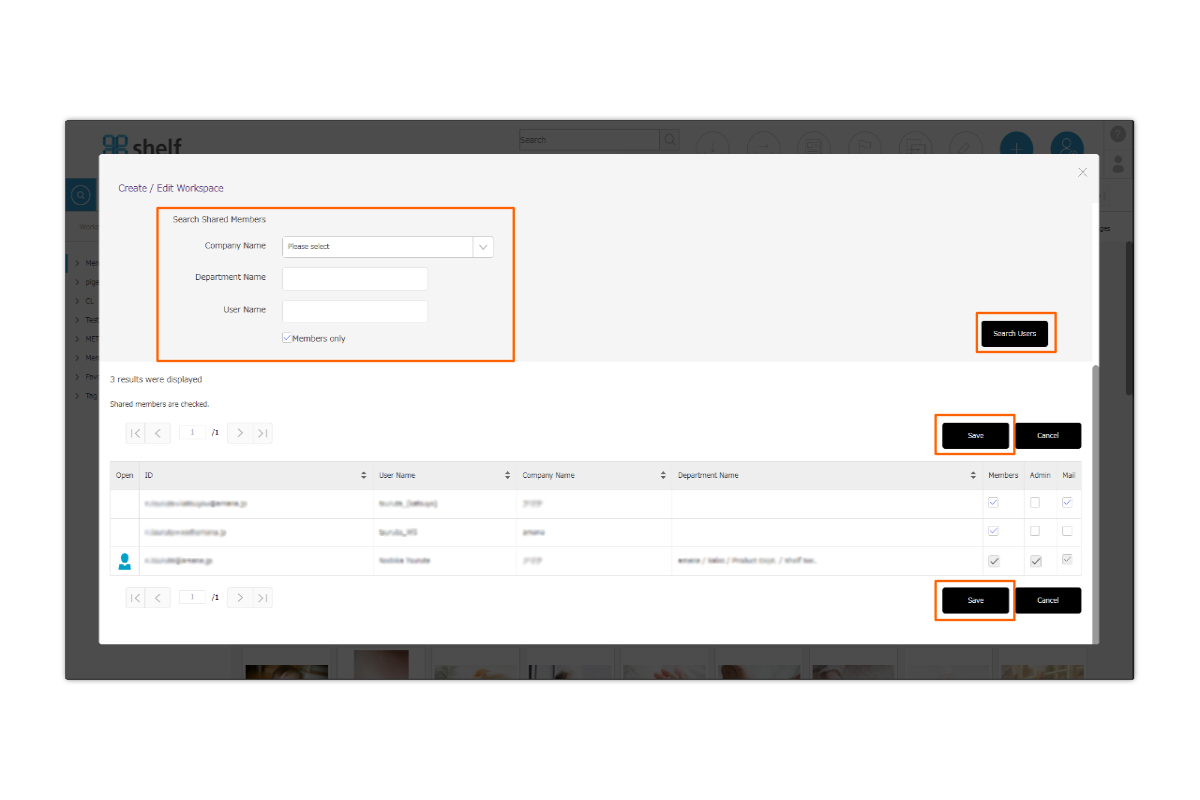
*![]() [person icon] in the “Open” column is displayed to the workspace creator.
[person icon] in the “Open” column is displayed to the workspace creator.
*Regardless of the User permission in the shelf, any member who checks the box for Administrator can make changes to their workspace information.
- When a new workspace is created, a notification email will be sent to users who have registered as members.
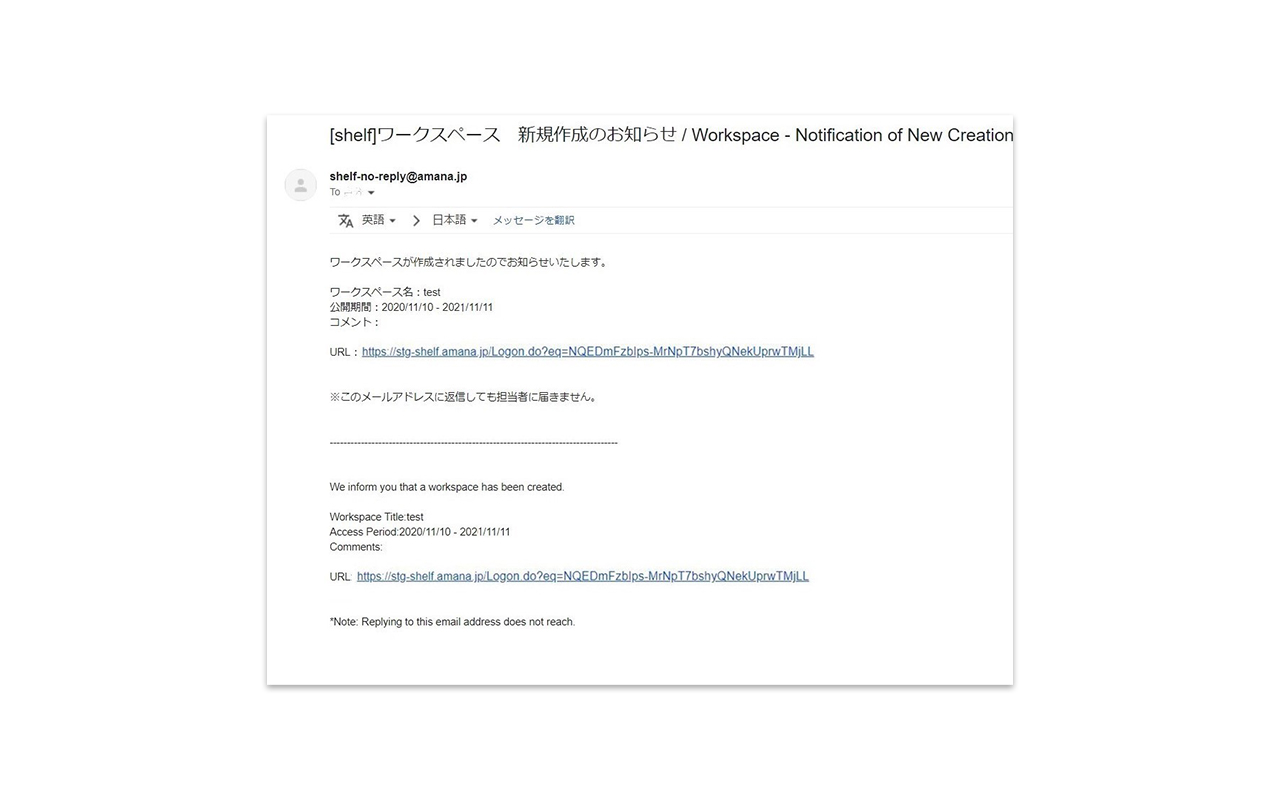
*You can enable or disable notification emails (set to “ON” by default). If some users do not require notifications,
please uncheck the checkbox to the right of the respective username and click the [Create] button.
Please note that “New Workspace Creation” and “Member Addition/Removal” notifications will always be sent to the relevant members, regardless of this setting. *This setting only allows you to disable notifications for content, comments, and proofreading registrations.
- When the Workspace window appears, click the “Edit” button at the bottom.
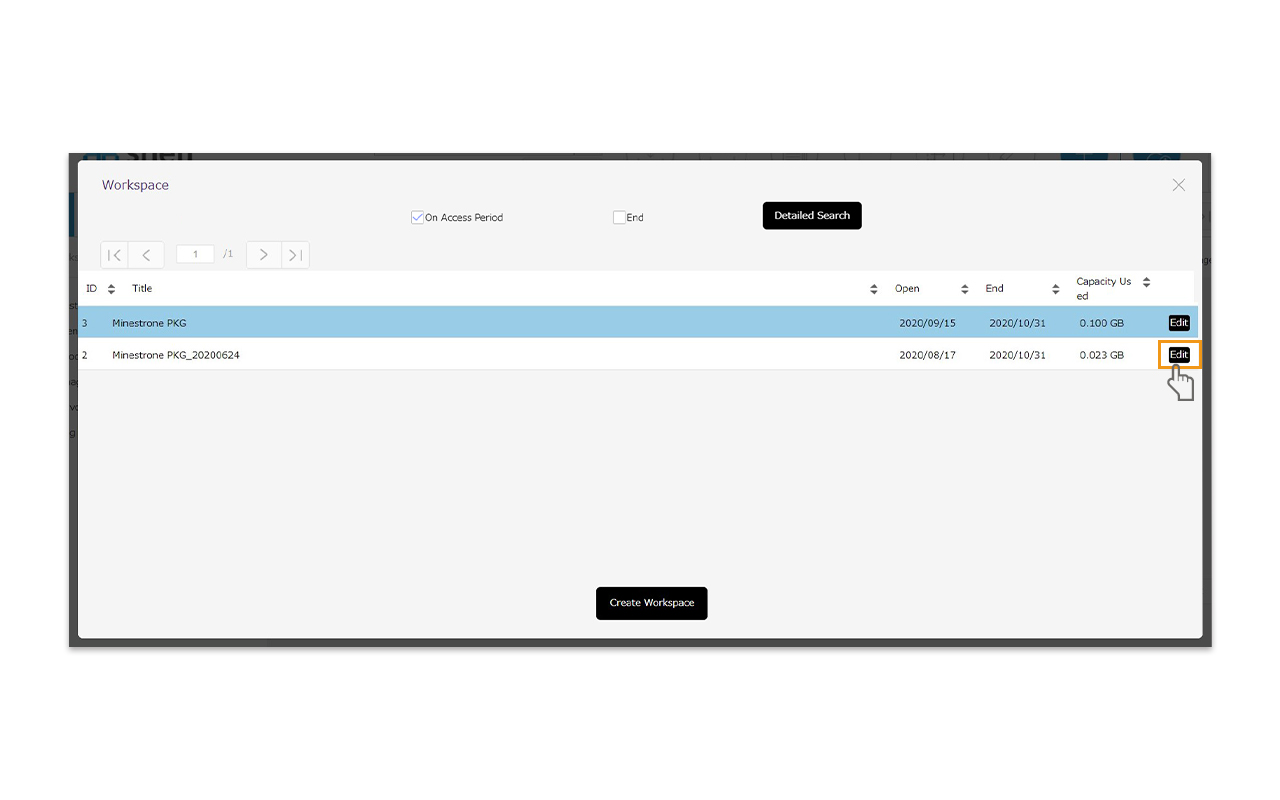
If you have already selected workspace and opened the content list, click [Workspace Details] on the left side of the screen, and then click the [Edit] button in the center of the page.
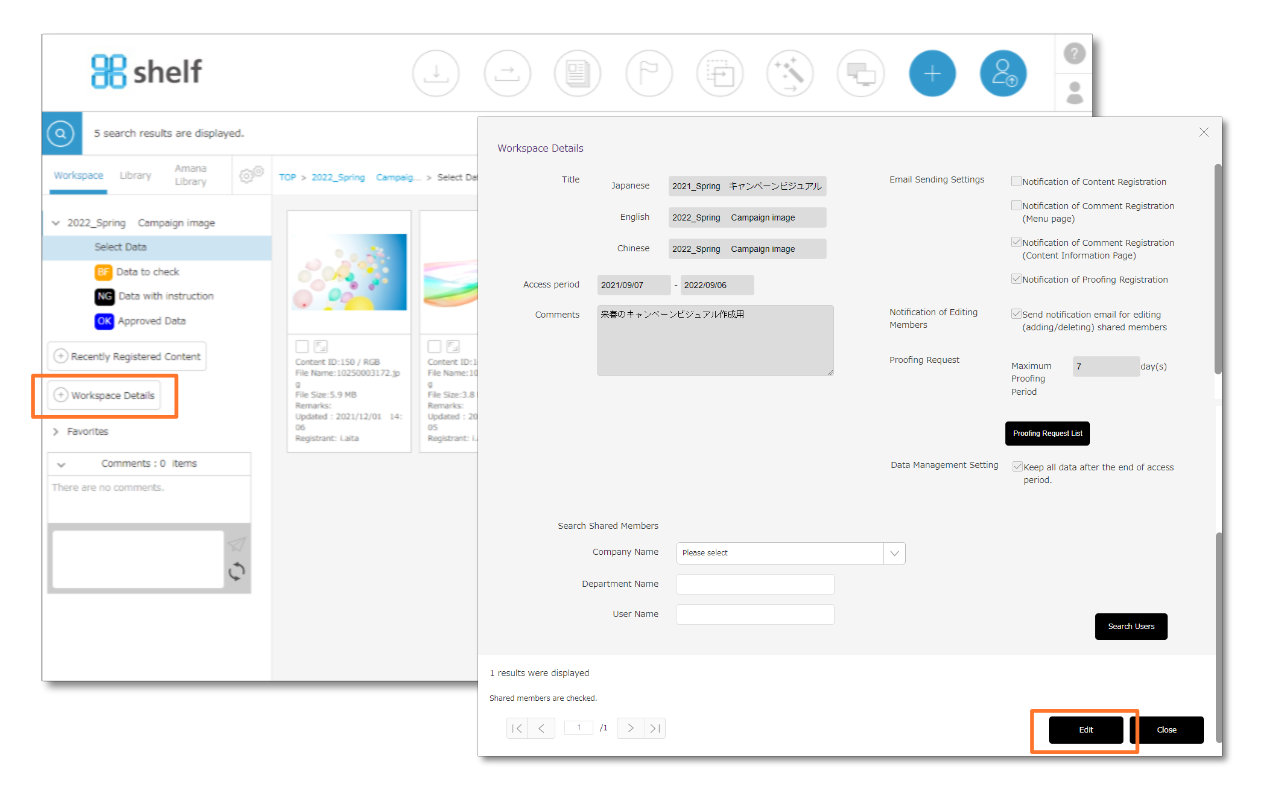
- When the “Create/Edit Workspace” window is opened, change the items you want to edit.
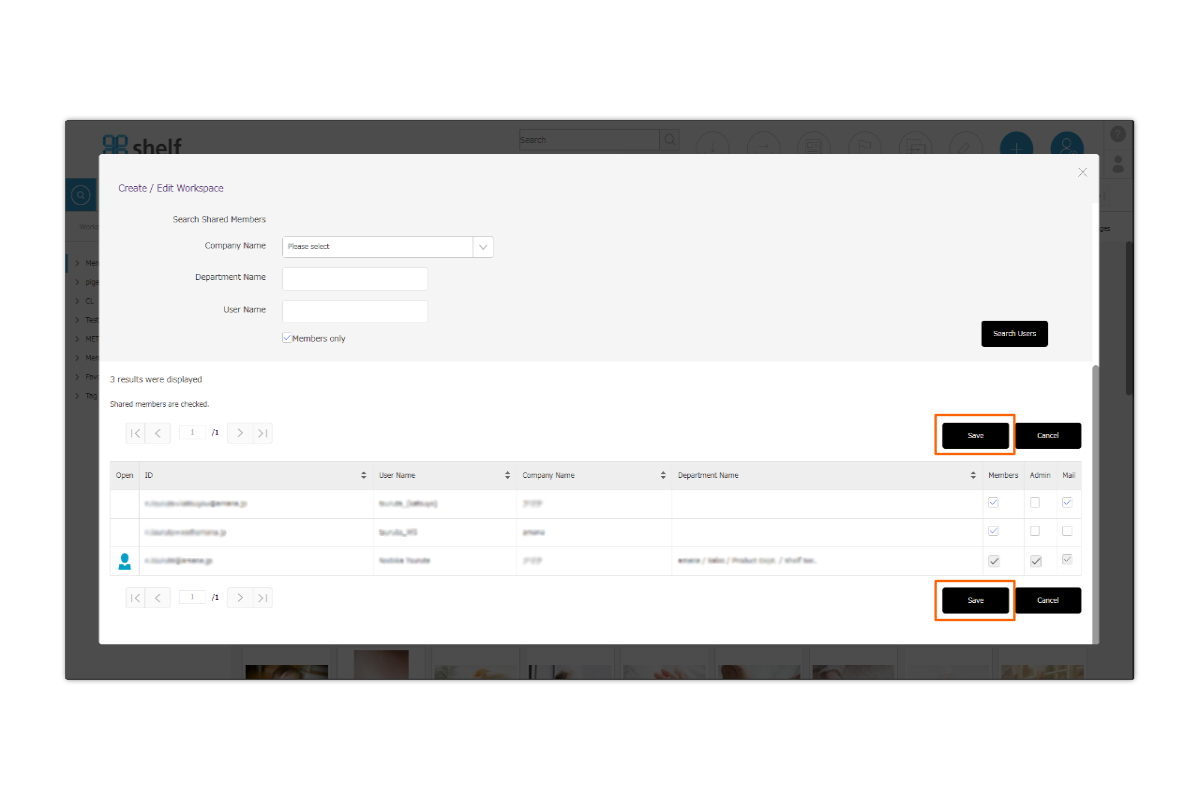
- Adding member
Select the members you want to add in [Search shared members]. - Deleting member
Uncheck the access permission (Member/Administrator/ Email) on the right side of the registered members list.
*You can also change a member’s access permissions here.
*The workspace creator cannot be changed his/her access permission. - Extending open period of the workspace
If you want to extend the workspace open period, please change the end date. Only the end date of the access period can be edited until one month after the access period. below. - “Keep all data after the end of access period”
*If “Keep all data after the end of access period” is checked, the data can be still available for browsing after one month has passed from the access period end. The system administrator or Site Manager can also change the access period end.
- Adding member
- Click [Save] when you have completed your entry.
- If a new member is registered, a notification email will be sent to the newly added member.
If the registered member is deleted, a notification email will be sent to the deleted member.
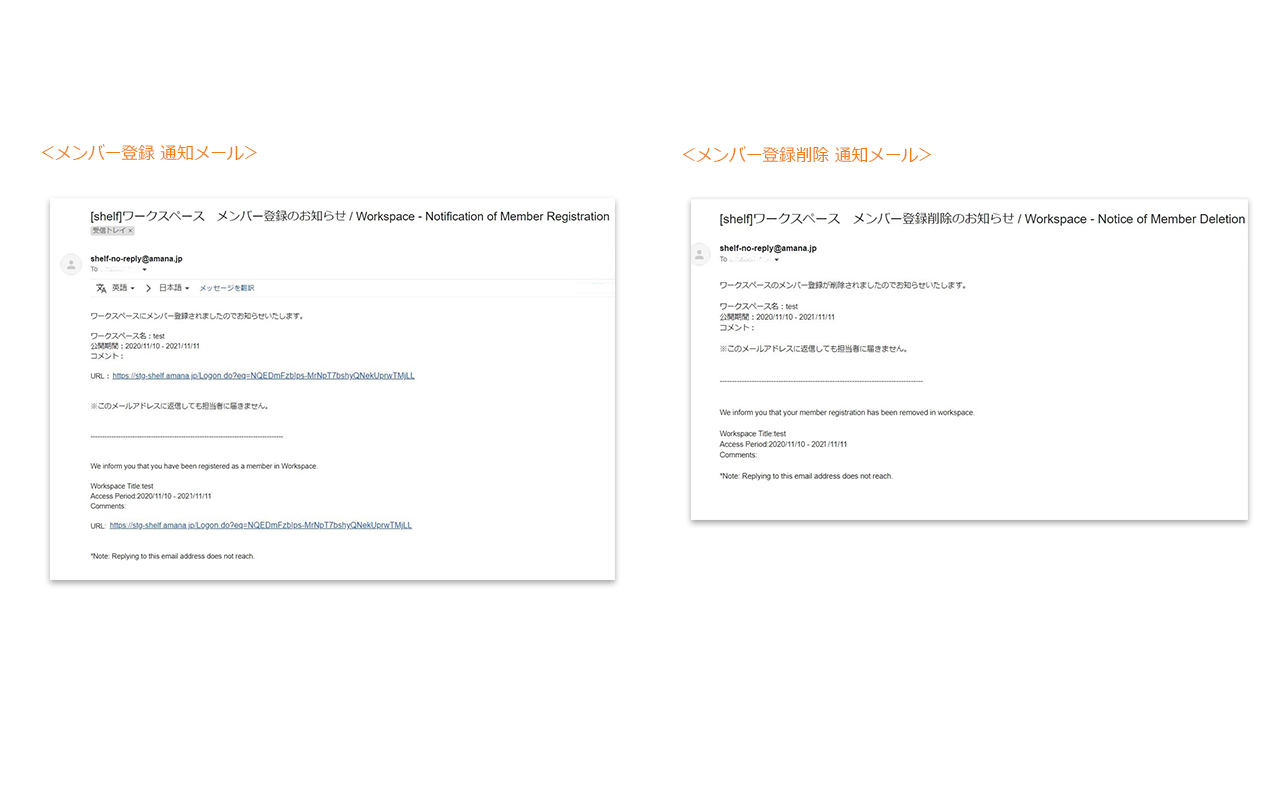
*The sending of notification emails can be set to turned on or off. By default, it is set to send ON.
If you do not want the notification email, uncheck the checkbox on the right side of [Create/Edit Workspace] window and click [Save] button at the bottom of window.

【Delete Workspace】
The workspace cannot be deleted by operation.
A notice mail will be sent to the workspace admin and the creator both 14 days and 1 day before the end of open period.
You can access workspace until one month after the end of access period. After this period, the data management conditions will differ depending on workspace settings.
1. Checked “Keep all data after the end of access period”
If you check “Keep all data after the end of access period.” checkbox in Data Management Setting, workspace will be saved and accessible even after one month from the end of the access period indefinitely.
However, after one month from the end of the access period, only the system administrator or site administrator can edit the workspace information. Members who do not have editing permission can only reference the workspace information.
Only “Register to Favorites” and “Contents Comparison” are available for data operations. You cannot proceed with the following operations:
– Content Registration
– Enter/edit comment on the content menu page.
– Enter/edit proofing.
– Enter/edit comment in the proofing window.
– Delete Record
– Update Remarks
– Downloading
– Sending
‐‐Proofing Request
2. Unchecked “Keep all data after the end of access period”
If you do not check “Keep all data after the end of access period.” checkbox, workspace will be automatically deleted after one month from the end of the access period.
Please refer to [Create Workspace] for more details about data management setting.
<Extension and editing after the access period ends>
To extend the access period, change the end date on Create/Edit Workspace window. Only the extension of the end date can be edited even after the access period ends before it is deleted. Also, if you want to change other items after the access period is expired, you can edit them by setting the end date to a date in the future and changing the workspace to the active status at once. Please refer to [Edit Workspace] for details on how to edit.
*If “Keep all data after the end of access period” is checked, the system administrator or site administrator can edit the access period end date even after one month has passed from the access period end.